
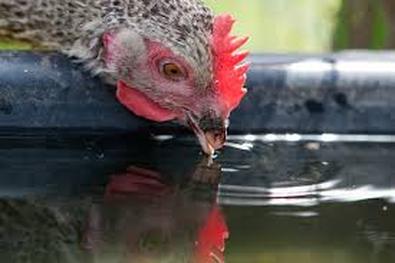
Chickens, like all God's living creatures, need water to survive. While some people can't live without their Perrier, it seems that hardier folk can get by with a shallow divot of dirty water and a straw. While I would never go to the expense, or trouble to provide my hens with Perrier, I wouldn't want them to slurp from a mud puddle either. I must confess, as a newbie chickener, and a recovering perfectionist, I actually agonized over what kind of chicken waterer to provide for my little flock, please forgive me. Besides, it isn't that hard to be daunted by the plethora of choices out there, really there are too many to choose from. I realize that chickens are animals, and there seems to be the prevailing thought among some people (mainly those who don't keep animals), that their water doesn't need to be that clean, but au contraire mon ami! There are animals (besides chickens) that will get very sick if they ingest foul water (no pun intended), like sheep for instance. And like sheep, chickens are too stupid to know that they shouldn't poop in their water, or they shouldn't wade in their waterer with their poopy feet.
Enter the best invention for safe clean water for chickens, since, well, I don't know what. Anyway, let's just say the watering nipple is a really great solution to the "clean water for chickens" problem. But then another problem arises with the solution, because as with many things in this life, there are far too many choices to chose from.
Enter the best invention for safe clean water for chickens, since, well, I don't know what. Anyway, let's just say the watering nipple is a really great solution to the "clean water for chickens" problem. But then another problem arises with the solution, because as with many things in this life, there are far too many choices to chose from.
The Tyranny of Choice
As great inventions go (poultry nipple waterers included) there are many versions to chose from, so which one is right for you? I will now attempt to list some of the choices you will encounter, and tell you what they entail. Just for starters, you will encounter some of these choices:
- 360 large amount of water for large beaked birds like geese
and they boast no leaks, provided they are installed correctly of course. As far as water pressure, it can only handle anywhere from 1 to 8 psi. A pressure regulator will be needed if you want a continuous on demand supply.
- Vertical nipples are gravity fed, which means these can only be mounted beneath
a bucket, bottle or pipe. They tend to leak more readily than the horizontal
nipples, especially if they are not mounted correctly, or have debris stuck inside
the housing. Also, these nipples can only take 1 to 8 psi, that means you can't
hook your hose to the bucket or PVC pipe unless you want a sprinkler system
in your coop or run.
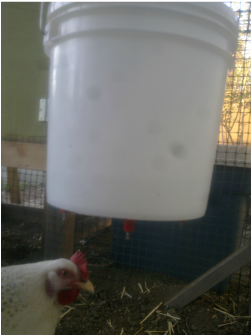
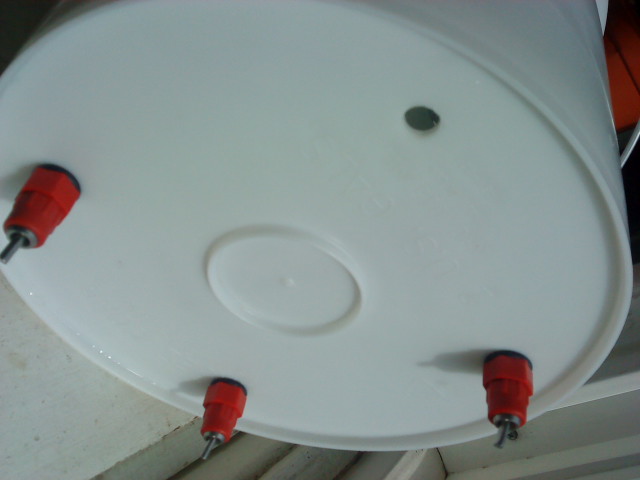
Each of these nipples can service 1 to 4 birds, some say more. I went into over kill, and put 4 nipples in my waterer, and amazingly, all five of them seem to use the same nipple! And each of these types can be mounted using several different types of reservoirs, either from a hanging bucket, or a PVC pipe mounted near a wall to save space. But these are not the end of your choices, read on and find out more...
- 180 or 360 degree nipples dictate the flow rate of the water coming from the nipple.
- 360 large amount of water for large beaked birds like geese
- Horizontal, or Vertical mounting
and they boast no leaks, provided they are installed correctly of course. As far as water pressure, it can only handle anywhere from 1 to 8 psi. A pressure regulator will be needed if you want a continuous on demand supply.
- Vertical nipples are gravity fed, which means these can only be mounted beneath
a bucket, bottle or pipe. They tend to leak more readily than the horizontal
nipples, especially if they are not mounted correctly, or have debris stuck inside
the housing. Also, these nipples can only take 1 to 8 psi, that means you can't
hook your hose to the bucket or PVC pipe unless you want a sprinkler system
in your coop or run.
Each of these nipples can service 1 to 4 birds, some say more. I went into over kill, and put 4 nipples in my waterer, and amazingly, all five of them seem to use the same nipple! And each of these types can be mounted using several different types of reservoirs, either from a hanging bucket, or a PVC pipe mounted near a wall to save space. But these are not the end of your choices, read on and find out more...
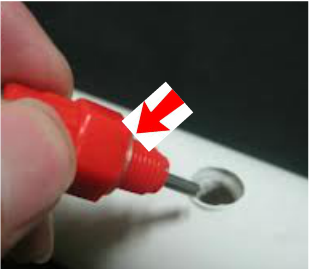
Here it is....the little red toggled wonder, I use. The 180 degree nipple is what I need since I have chickens (they have small beaks) I don't want to drown them, or encourage them to make mud puddles. The threaded end goes into the water reservoir, whether it is a lidded bucket, bottle, or PVC piping (something enclosed) that will keep out dirt, poop, and other debris. When the chicken pushes the toggle up with her beak, the pin moves the ball bearing upward, just enough to push the other
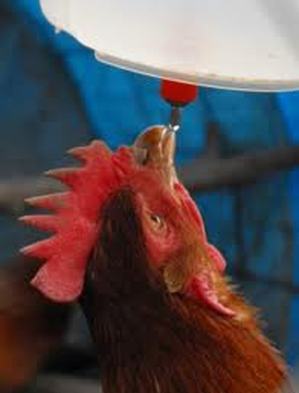
toggle up and to allow nice clean water to trickle down the nipple's innards and into the chicken's parched beak - ah - refreshing!
However, like all plumbing fixtures, this thing has the potential to leak, and leak it will, if you don't install it correctly, believe me I know! Let me tell you all about it.
As a rookie chickener, I searched the typical sites like Youtube for tutorials on how to go about making my own chicken waterer using these nipples, and of course there were many such videos, and on each one, I saw someone demonstrating their own method of installing these nipples, in basically the same way, but with some variations. When I finally got around to purchasing the nipples, I realized why there were so many nipple installation methods. It's because most of these water dispensers don't come with instructions. Well, at least the ones I purchased from the feed store didn't come with instructions. I don't know about you dear reader, but I like instructions, especially since I hate construction, and that's because I'm not good at it. Even so, I was fairly confident (more like deluded) that after watching many of the Youtuber videos, that alone made me an expert! (Silly Hen!)
Oops, did I forget to mention....?
The one thing I have learned by watching Youtube videos, is that being a teacher and making videos (good videos) takes skill. A good teacher is able to captivate their students as they deliver a lot of important information effectively, and hopefully concisely for those of us who are impatient, like yours truly. But not every person on Youtube is a good teacher, or good at making videos, and not everyone runs into the same problems with the product they are demonstrating, nor do they always think to make mention of things they consider to be a no-brainer. So, I must cut them some slack on the ...."oops, did I forget to mention ...?" department, simply because they may not have experienced the same situation you are experiencing. But a good teacher must never take the simple or basic things for granted, as those neglected minor details often end up becoming major catastrophes in a hurry.
Wise-man or Genius?
There is a saying I want to share with you, and it goes something like this: "A wise man learns from his own mistakes, but a genius learns from the mistakes of others." And so, I am going to journal what I have learned in the process of making my chicken waterer as a newbie, and then pass on what I have learned on to you dear reader, thus making you, a genius!
Not All Chicken Nipples Are Created Equal
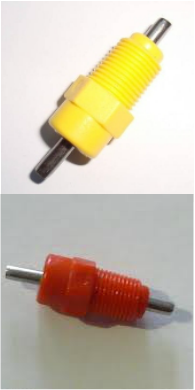
 Horizontal nipple waterer
 We all know that you get what you pay for, right ? This is very true, even in the surprisingly vast world of chicken nipple waterers. The quality of materials used to make the nipple (high density plastics and stainless steel), how it is constructed, and how it is installed. All of which lend themselves to the types of waterers out there on the market, and will dictate how well they perform, respectively. For instance, if you buy the threaded type of nipple, those threads on a cheap plastic model will be easily damaged with a finger nail - meaning they'll leak easily. So make sure you are getting a good quality heavy duty plastic. Yes, they will be a bit more money, but they will save you money and time in the long run. Now I will go through the types I have run into, and they are pictured and discussed below. Also, I will be reveling what types of containers work best for each type of nipple, I'll bet you didn't think that was important did you?
Push In w/ Grommet Nipple
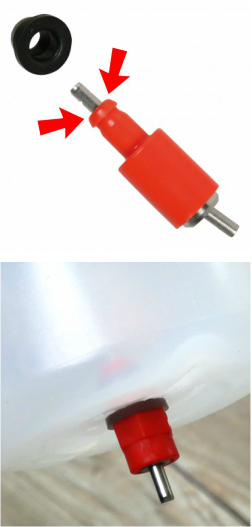 red arrow end goes into the bottle
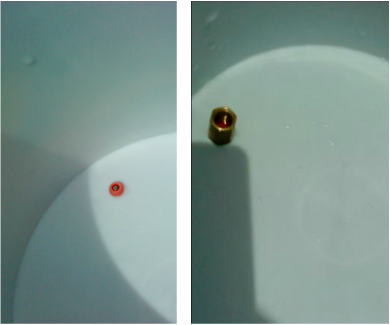
 This nipple is very great for all types of water containers be they thin light weight plastic bottles, heavy duty buckets, or PVC pipe systems. It is easy to install, and requires virtually no construction skills. I couldn't find this type of nipple locally at my feed store, and I couldn't find it online, mostly because at the time, I didn't know what to call it. Anyway, If you can barely operate a drill, and you can push a button, then you are on your way to clean water for you hens! The pressure of the rubber grommet on the rim of the hole exerted by the inserted nipple is a type of compression seal, and that is what will make this connection water tight. And because there are no threads, then it doesn't matter what the thickness is of material your chosen water vessel has. More on that later.
The grey, or black grommet itself is removable from the neck of the red (or yellow) nipple, and is then inserted into the hole in the bottom of your chosen reservoir, in this case, a plastic water bottle. Most "experts" recommend a 3/8" (or 12/32" for you Algebra buffs) drill bit, but it wouldn't hurt to first try a 11/32" because it is better to make the hole slightly smaller, than too big. You can always remove material, but you can't put it back. a measly 1/32 of an inch may not seem to be a significant difference, but in the watery world of plumbing, it is a huge difference. The hole must be clean, or free of any burrs, to make a good seal and avoid damaging the grommet.
Now, simply push in the narrow, non-lipped end of the grommet into the hole until it "snaps" into place. Try not to twist, or push too hard, as this may tear or damage the grommet and will ruin the seal you are trying to create. Now inspect the grommet for tears, or puckers, which will show that the hole is too small, and will make inserting the actual nipple difficult, and also cause the undesired leakage.
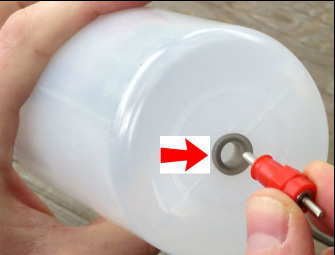 rubber lip of grommet outside the bottle
 Now insert the nipple itself into the grommet where it will rest against the grommet's rubber lip that over laps the container. A word on lubricants if you think you need one in this installation. First try a bit of water, or a food grade silicon based lubricant, if you have it (or if you can find it) otherwise forget it, because other lubricants will degrade the gasket, turn rancid, and/or, are poisonous. After inserting the grommet and nipple into place, fill the container and hang it were you hens can easily get to it.
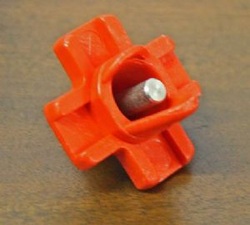
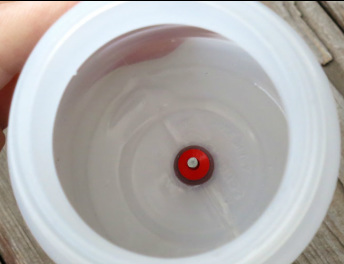 Inside view of seal | Now, if it starts to leak from the metal toggle, and not from around the grommet and hole of the container, then possibly there is some grit, or dirt that got into the innards of the nipple. The debris will lodge between the ball bearing and the toggle, breaking the 'seal' between the ball bearing and the inner gasket, and allowing water to pass through, it doesn't take that much, even a tiny grain of sand. Since |
the nipple doesn't come apart, all you have to do is keep pushing on the toggle to pass the debris though and it should stop leaking once the debris is gone, but if it continues to leak, then it may need to be replaced which is easy enough.
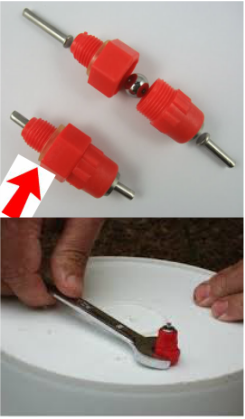
Screw In Nipple
Next up are the screw in types, and there are two kinds of those that I currently know of - the irremovable, and the removable. But they are both installed the same way, so I will just discuss how that is done here, and then discuss the difference between the two later. This is the type I got, and I learned a lot about them, mostly by what I did wrong. Why change what comes so naturally to me, right? Really, I wish there was a way I could avoid this way of learning, but I didn't run into any in-depth teaching about this type of nipple until the damage was done - of course. My thanks goes out to Becky from www.readmychickenscratch.com for helping me to see the err of my ways, concerning this type of nipple and its proper installation. Now then...
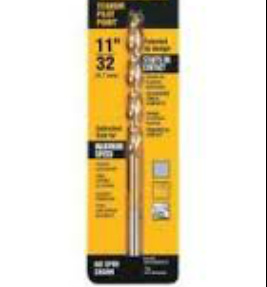
The size of drill bit you will need is 11/32, at least that is for most of them, according to Becky. This important tidbit of information was not shared on most of the videos I watched, so kudos to Becky for sharing that vital piece of info. Of course, my husband and I, used the two drill bits on either side of this magical measurement. The first hole was too small, and like the Goldie Locks syndrome dictates, the next bit we went with was then too large, which ended our happy ending real quick. Well, really the second hole seemed to be the right size, that is until we tired to screw in the nipple, which only spun in the hole without tightening down, and then it leaked when we put water into the bucket. But according to the other experts out there that ran into the same problem we did, that wasn't something that a lot of silicone and an overnight curing couldn't fix, which it did - for a while anyway.
Chose your water container wisely!
Now, if you will care to notice something basic that completely escaped me, and apparently the "experts", is that the type of container you use is very important when using this type of threaded nipple waterer. If you will also notice, this nipple has quite a bit of threads, and that IS very important. Why is that so important, you may ask?
 Silicone washer Silicone washer Well, your container of choice, must have enough material thickness for the threads to "grab" onto, or else the nipple will essentially just keep spinning in the hole, and never tighten, which will cause the silicon gasket it comes with, to not expand under the pressure of the tightening process, and thus not seal properly - it'll leak. These two things are where I went wrong. I didn't know, understand, and wasn't told, that the gasket on the nipple was indeed made of silicone, and would expand when tightened. Oh yeah, PVC piping is also a good choice too, since it has a good thickness of material (as you can see from the picture above). The PVC pipe is about 1/8" to 3/32" thick, allowing for several threads to bite into the pipe as the nipple is tightened with a wrench, or your hand if you are an arm wrestling champ. | 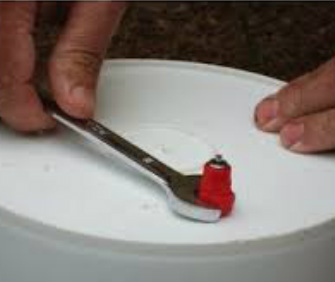 Tightening creates the seal Tightening creates the seal The bucket we used, was and is, a two gallon paint bucket, so the thickness of its plastic is minimal (maybe 1/16"), even though the bucket itself is sturdy, or rigid, which minimizes any kind of flexing movements, which can weaken this type of seal. This measurement though seemingly so tiny and insignificant is very crucial to getting a good seal, and providing stability for the nipple. A heavy duty 5 gallon bucket would be a better choice for this kind of nipple, and the lids of several types of sturdy wide mouthed plastic bottles, as they are rather "thick" and rigid. I always wondered why people would put these nipples in the bottle lid, which makes them kinda hard to fill, instead of placing the bottle "up-right", now I know why. They won't get any leaks, thanks to the lids thickness, and harder, and more stable plastic of the lid. |
I can't stress that enough ... in order for the "screw in" type nipples to work properly (without the use of extra silicone) the container you will be using must have the proper thickness of material to allow enough 'bite' surface, and the nipple's own threads should be made of strong enough plastic so it will 'bite' into the plastic of the container. If the threads of the nipple itself are so soft as to flatten, or crush, then it is no good, and will leak. Chickens don't lightly tap on the nipple, they smash at it, so if the water containers material has too much give at the point of connection, then it will stretch and leak. I will now let you in on what I did to fix the booboos I made out of ignorance, that of myself, and the omissions of the 'experts' out there.
The Fix
The silicone (not caulking) that many other 'experts' suggested on Youtube and other websites, did work for a while, but as recently as a week ago (only 3 months after construction), my chicken waterer started to leak like a sieve. So, I would classify the use of silicone as a miracle "fix all" for novice mistakes, is right up there with the other MacGyver-like adhesives such as: chewing gum, hot glue, and the infamous, duct tape! These temporary fixes are good to get you by, but only until you can get the problem fixed properly. Not wanting to silicone every three months, I had to find a better and more permanent solution, and as cheaply as I could.
On my first trip to Home Depot (every home improvement project requires at least two trips), I got some thick and tight fitting rubber washers thinking they would be enough to stop the leaks, but they didn't, the nipples still leaked. Rats! Undaunted, I rethought my approach, because thinking is very important in problem solving. I realized that I would have to make a compression type seal, if I was going to stop the leaking. Little did I know, that is exactly how these little babies are designed to work, to form a compression seal.
Anyway, I saw that there would be enough threading exposed, if I added a thin rubber washer, and then I could use some sort of nut that would thread onto the nipple from the inside of the bucket. I figured non corrosive stainless steel nuts would do the trick. So off I went to the Home Depot a second (and thankfully last) time. I picked up the rubber washers I needed and headed for hardware to get the stainless steel nuts - so very logical, right? Wrong! Did you know dear reader, that there are different types of threading on screws, and bolts? I do now, thanks to the girl in hardware. We should all learn something new every day, wouldn't you agree? The type of threading on this nipple is a plumbing thread, not a hardware threading, since it deals with H2O, and this was one of those many "ah der" moments in my life. The nice man in the plumbing department then gave me the proper nut to "seal" the deal! In my case it was a 1/8" FIP (Female Iron Pipe) brass pipe coupling. That is the size and type of threading I needed.
Anyway, I saw that there would be enough threading exposed, if I added a thin rubber washer, and then I could use some sort of nut that would thread onto the nipple from the inside of the bucket. I figured non corrosive stainless steel nuts would do the trick. So off I went to the Home Depot a second (and thankfully last) time. I picked up the rubber washers I needed and headed for hardware to get the stainless steel nuts - so very logical, right? Wrong! Did you know dear reader, that there are different types of threading on screws, and bolts? I do now, thanks to the girl in hardware. We should all learn something new every day, wouldn't you agree? The type of threading on this nipple is a plumbing thread, not a hardware threading, since it deals with H2O, and this was one of those many "ah der" moments in my life. The nice man in the plumbing department then gave me the proper nut to "seal" the deal! In my case it was a 1/8" FIP (Female Iron Pipe) brass pipe coupling. That is the size and type of threading I needed.
 | 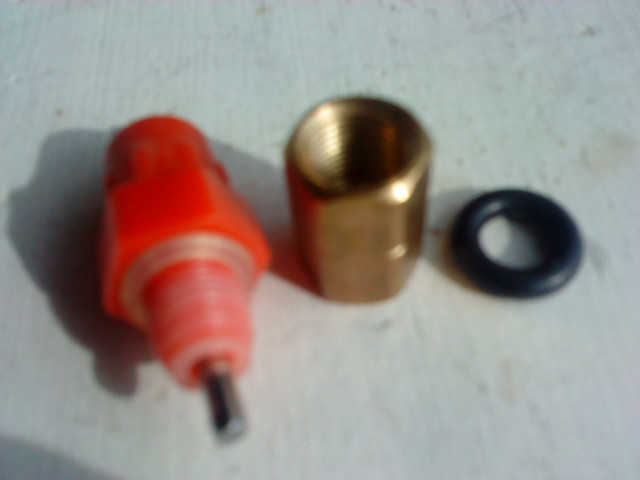 | 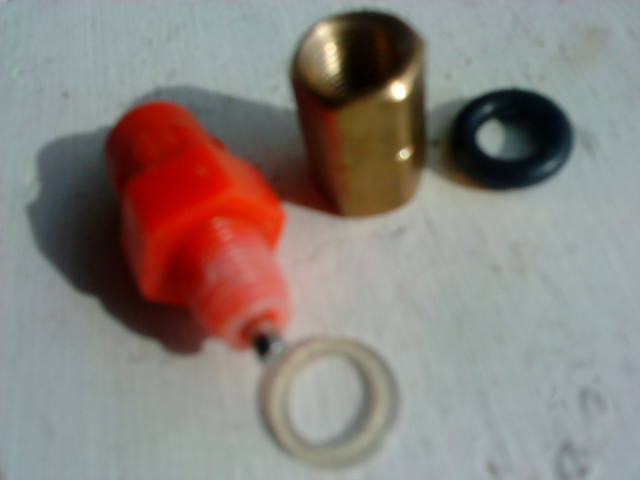 |  |
Once at home, I removed the silicone washer the nipple came with, and replaced it with the rubber one. Again, I didn't know that the original washer was made of silicon, and would spread and seal when tightened. That's something I learned by watching Becky's informative video - - afterward. Oh well. Then I placed the nipple into the bucket and with the brass nut, I tightened it onto the "male" plumbing threads of the chicken nipple inside the bucket until it was just tight. I didn't want to make it too tight, which I'm sure would have caused me to make the classic 'third trip' to Home Depot.
 |  |
At last, the moment of truth...I filled the bucket with water, and held my breath. Then as I watched carefully for any leaks, one of the nipples started to slowly leak! Darn it! But don't worry, I learned from another blog site that is most likely because the center nut of the nipple itself needed to be tightened (which it did), or there might be debris in there.
Success at last! Even my husband was impressed with my solution, but too bad it cost me around 13 bucks! I would have saved 3 whole dollars if I used the silicone seals the nipples came with, oh well again!
Success at last! Even my husband was impressed with my solution, but too bad it cost me around 13 bucks! I would have saved 3 whole dollars if I used the silicone seals the nipples came with, oh well again!
Irremovable Screw In Nipple
This type of screw-in nipple is "irremovable" and that simply means that the inner parts of the nipple are sealed in, or you can't take it apart by unscrewing it for easy cleaning. Like the push-in type grommet nipple, all you have to do (if some debris is stuck causing it to leak) is to keep moving the toggle to wash away the debris, until it stops leaking. This can also be done when it comes time to clean it with a mild detergent. However, if the nipple is still leaking, then it may need to be replaced. If you will notice, this type of nipple doesn't come with any kind of sealing gasket, or silicone washer. That means these are the ones that require the use of Teflon tape, which is a white stretchy tape you will find in the plumbing department of your local home improvement center. With two or three passes, (make sure you wind it in the same direction you will be screwing in the nipple) a good seal should be achieved. Or you could use that miracle wonder, silicone. And I mean silicone, not calking, there is a difference! On one "expert" website, they call this tape "thread tape", or another name I've seen is "seal tape", or you could combine the two as "thread seal tape." Anyway, I'm sure the pros at your home improvement store will know what you are talking about. Again,the type of water reservoir you should use with this type of nipple is one that has a good thick amount of material for the threads to bite into, and is rigid, or it won't work.
Removable Screw In Nipple
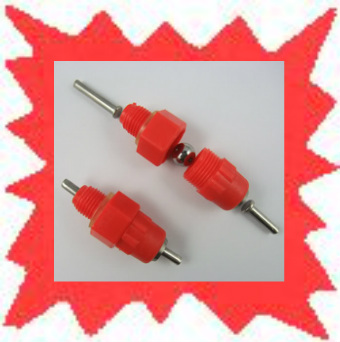
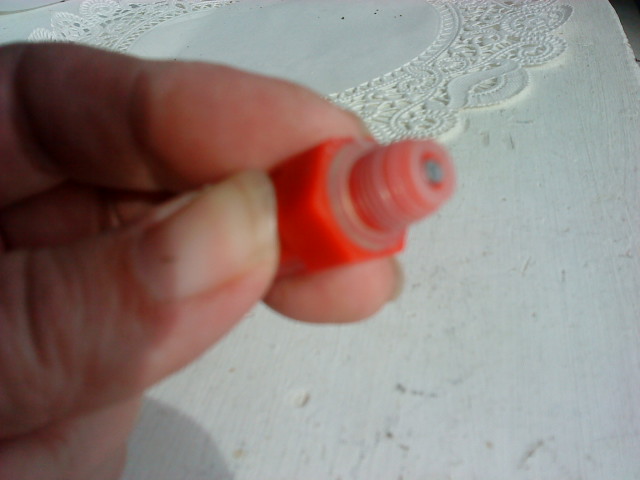
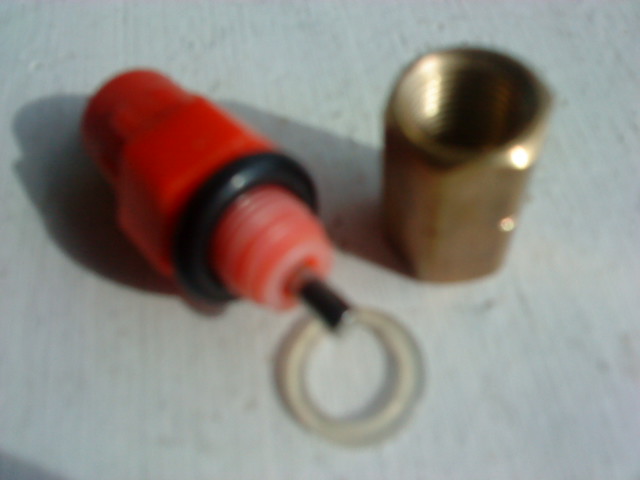
This is the nipple I purchased. As you can see, it does come apart by unscrewing if from the middle of the nipple. This makes for easier cleaning if a really large chunk of debris finds its way in to the nipple, or when cleaning with mild detergent, or to replace warn parts. However, it would probably be less expensive to just replace the whole nipple after paying shipping costs for tiny parts. Also, don't hold this nipple over a sink when you are unscrewing it. I almost lost the ball bearing down the drain - supper genius - I know.
Thankfully , my kitchen drain has a drain basket - whew! This is the model that comes with its own self-sealing silicone washer (note red arrow). If you want to go overboard and use the Teflon tape too, I wouldn't recommend it. It is one more hassle, and it will probably get in the way of the silicone washer's seal. And to be honest, I didn't look up to see if Teflon tape was safe to use, as Teflon has been known to kill birds, well, when it comes from the fumes of the cooking pans anyway.
Thankfully , my kitchen drain has a drain basket - whew! This is the model that comes with its own self-sealing silicone washer (note red arrow). If you want to go overboard and use the Teflon tape too, I wouldn't recommend it. It is one more hassle, and it will probably get in the way of the silicone washer's seal. And to be honest, I didn't look up to see if Teflon tape was safe to use, as Teflon has been known to kill birds, well, when it comes from the fumes of the cooking pans anyway.
Buyer Beware
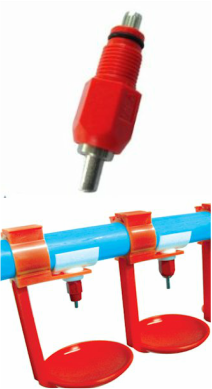
Then there are those distributors that boast that their poultry nipples don't leak and even guarantee it. For instance, this is one I found, but I don't get how they can guarantee it doesn't leak when the black rubber gasket is way above the connection area. They also offer a "nipple adapter", but they don't show what that is, or why you would need one - very frustrating. There are also some nipple systems that have some sort of drip cup that is held beneath the nipple/bottle system, why I don't know, is it for those chickens who prefer to drink from a dish? Perhaps it is to help prevent muddy, or wet conditions for messy hens with a drinking problem.
Anyway, what I have learned through this experience is that there are a lot of choices out there, but as a consumer, you have to educate yourself very well, before you make your choice and purchase your nipple of choice, that is if you want to avoid costly and frustrating mistakes.
If you completely understand what type of nipple will work best for the type of water container you will be using for your situation, then your decision will be made much easier, as I hope I have made it clear, not all nipples work with all containers, and are not all the same in construction and quality of materials.
Cheers, fellow newbie chickener!

 RSS Feed
